This was our first time throwing a BIG party for Addison. The girls birthdays are usually spent with family and relatively small. Since it was pretty HOT here in NC we decided with a July birthday, a water slide was in order! Just a few shots from last Sunday's birthday party. Birthday girl Addie (3 yrs.) and big Sister Gracie (5 years).
Birthday invite! I kept them relatively simple since I made 20 of them. The Star theme was based around my Star Stamps from PTI's 2nd anniversary set.
Goodie boxes! I printed off the box tags and added a simple scalloped nesty die border and of course, more stars! I attached a silly straw on the side of the Chinese take-out boxes which also doubled for candy "catchers" for the pinata.
Addie getting geared up for the Hello Kitty pinata!
Here is the cupcake stand I showed you a few posts down (previous post with the brownies). Just goes to show the versatility of what you can display on this stand. I've seen some neat ideas to also store art supplies as well themed parties/holidays.
Thursday, July 30, 2009
Tuesday, July 28, 2009
Magical Tooth Fairy Box...
...because it's for someone very special to me...my Gracie bug! I have made several tooth fairy boxes in the past, this time around it's for my oldest Daughter! When she first told me her tooth was loose all I could think was, "oh man, ALREADY?" Every developmental stage seems to be creeping up on me and they seem to be coming much faster than I'd like them to:( While we were on vacation in GA, Grace lost her tooth and I started to panic about not being prepared and having a box ready for her. I explained to her that since we were on vacation that she'd have to wait until we got home because the tooth fairy wouldn't know she was on vacation...this totally bought me some time to whip up a special box for her...ha! The previous boxes I've made were from circular wood boxes and since I didn't have anymore, I decided to use a gift card tin. The fairy is a sticker that I laid down on some Pixie Pink CS and trimmed close, leaving a small border so it would pop on the YoYo Yellow CS. I cut all my CS to size and sewed on the yellow cs. To create the wording I used my Karen Foster Snap Stamps. I also took a long strip of adhesive rhinestones and traced around my circle with them for a little extra sparkle!I love this slick container...made it much easier to slip in and out of her pillow! Gracie was beyond excited when she woke up the next morning:)
Friday, July 24, 2009
Retirement Banner...
Another fun banner! I love the bright colors and glitter (LOTS of Stickles going on here!). I needed to make this banner small enough to fit into a glass window for display. I "think" I cut each triangle at 4 inches on the top for a perfect fit!
I used several pieces of chipboard and spread coordinating Stickles on each one. Every time I think I'm about to run out of my glitter glue, I always find new ones I've never used...still with wrapper on the lid! The reason I prefer Stickles over regular glitter and glue is because the Stickles have a nice clean finish and the glitter doesn't "flake" off. I do have several large bottles of Martha Stewart glitter just sitting around...those bottles will probably end up in my girls' craft stash...lol
The 3-D vacation stickers are from Michael's. I love the extra depth the stickers add to the over all theme. The patterned paper is from a free pack I received at Archiver's...had just enough to complete this project!
Thursday, July 23, 2009
Here is Baby Kate!!!
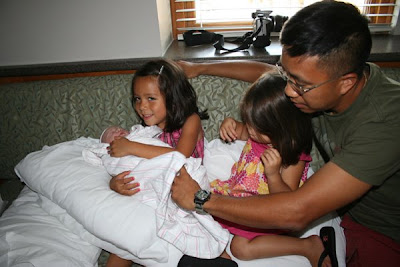
Hard to believe she is 2 weeks old already! Here is my beautiful new Niece, Katelyn Elizabeth! She was born on July 8th weighing in at 8 lbs. 4 oz. in Atlanta, Georgia. I always give my twin sis a hard time saying she is the one who has BIG babies...lol Big Brother Aidan L to R: my Daughter Gracie, Me, Baby Kate & Sisters Christie and Jill! My beautiful older sister Jill with all her Nieces, the 2 oldest are mine(although you wouldn't know it with those tans!), Addison and Grace!
Holding Kate for the first time...Addison kept telling me that "Chrissy have new Baby Mommy!" Too precious.My hubby with the girls...
The first thing they wanted to do was "dig" for her tiny feet, they were so excited!
I think the 3 girls are going to enjoy growing up with each other...they are already asking for another one??!!!!
Monday, July 20, 2009
Glue-Art & Paper Studio Project...
The "lazy days" of Summer have hit home this year! I have been enjoying my little ones and we've been on the road here and there! With most of the BIG things out of the way, I think I'm home for the rest of the Summer before school is back in session in August...where does the time go? I also just returned from GA where my beautiful new Niece Kate was born on July 8th! I will be sure to share a few pics of Baby Kate this week. My 2 girls were all over her and wanted to bring her back with us! It has been nice to take an extended break from blogging as there is A LOT of behind the scenes work that goes on before I can even post something fun to share. Sooo, without further delays, I bring you the Glue-Art & Paper Studio Cupcake Stand! The whole Patriotic Theme will go in conjunction with a party we are throwing my now 3 year old this weekend. Her actual birthday was on the 18th, but this year we decided it'd be fun to throw a party! I originally had a princess theme on this cupcake stand, but my little girls had pulled off more flowers and it began looking bald, so it was time for a makeover. Since I will be making cupcakes this weekend, I thought it'd be fun to show this display with some fresh baked brownies! You really could use and finger foods or desserts on here, but don't those brownies look scrumptious????
Pulled out the ol' 2nd Anniversary PTI set again...love it! I repeated the star theme thru out the 3 tiers and added a few stamped flowers here and there. The outer rim of the second tier is trimmed in punched flowers (Martha Stewart Punch), SU! small circle punch, and rhinestones.
See that cute bow that I tied on the triangles? Well, it did start out as a mini pennant banner, however, once I got it all cut and strung with the cross-stitch thread it was too long for displaying on the front. I figured I'd mess around with it and tossed it aside while I worked on the rest of the project. The banner happened to fall in place of a circle and I thought it'd be fun to try to circle idea on the tier itself...VOILA! Once I tied and glued the banner down, I went back in between and added the silver (dew drops silver ink on blue cs) stars with buttons.
Fun nautical stripes!
Now, now, it's not what you think??!!! I didn't eat all the brownies by the end of this post...I did pass them on to my neighbors and kiddos though! Thought you might like to see what it looks like in plain glory:) I would suggest if you plan on using this for food, simply cut some wax paper to fit and set it on the tiers before you display the food. The grease from the brownies and cupcakes could stain your beautiful artwork. Another option for easy wipe off would be to put a few coats of mod podge on the tiers to prevent staining if you want to use this often. The possibilities are endless! I just totally thought of a cute idea for a baby shower...fill small glass jars with baby essentials and use them as a centerpiece at the party! Be sure to check out more ideas from the Design Team!
Subscribe to:
Posts (Atom)