I had to laugh at myself on the last post about my hubby installing "Foxilla"...lol Just shows how little I know about computers...it was Firefox Mozilla! I still have to do some adjusting when uploading my pics and I "think" I may have corrected the change in my HTML format...THAT much I DO understand:)
Anyhoo, another Valentine notebook to share with you! I really do love this K&CO Valentine paper deck and unfortunately I wanted to get more at Micheal's and they are SOLD OUT! This paper deck, although sold as "Valentine" paper, really can be used all year round...that's why I'm addicted to it!

After trimming and adhering all my cs, I did a little ink distressing and sewing before I did the stamping. For the stamping I used Dew Drop Inks (Plumeria Pink, Sahara Sand) along with my PTI stamps (
Polka Dot Basics,
Text Style II). The ribbon is Martha Stewart in a very soft cocoa shade.

Like my previous post, I once again used my EK success double edge punch, but this time I turned the scallop design to face the top vs. the bottom. I sewed my edges for a finished look and added some pink adhesive rhinestones. The sentiment is from
Verve Stamps and I used 2 shades of pink for the heart, a light pink for the entire heart and a darker pink on the outer edges. Using 2 different shades really allowed for the heart to have added depth on the card stock.


 Once I colored my flowers (PTI-Friends Til' the End), I used 3 different yellows for the center and added some adhesive rhinestones. I embossed "friend", did a little edge sewing, and added a 3 layered butterfly (Martha Stewart-Large Butterfly Punch).


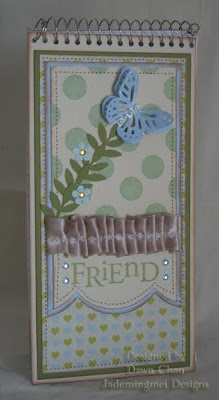 Martha Stewart large butterfly punch. I did 2 butterflies for a little added flair along with some Star Dust Stickles on the top layer. There's that darn
  Added a little bit of MS satin ribbon and hand guided it through my sewing machine. This particular ribbon is very slippery when using on the sewing machine. To thread the ribbon through, I use both hands (to hold the ribbon "somewhat" straight) and my right hand AT THE SAME time to turn my sewing knob by hand. It is quite the feat, but I do love how it adds a little elegance to a simple layout. Paper here is K&CO, solid colors are SU! and the scallop at the bottom is EK double edge scallop. I'm trying to better my skills with sewing MORE than just straight lines. I took the rounded edges slowly here, and although not exactly how "follow-the-line" it should be, it works!
 I hope you enjoy and create today! As I'm typing this something funky is going on with my font and underlining etc. Hubby installed Foxilla last night and I think it may be interfering with my photo editing and the HTML...grrrrr! I'm going to hit the publish button and hope for the best!