You may remember several recent posts on a Mudpie inspired birthday party. Well, here is a new customer order with some of the same touches and some new party ideas! Same banner, but personalized just for Ella! I used crystal effects(using A LOT lately!) for her name for texture and shine. Mini banners for a cupcake stand or potted plant centerpiece. A little glitter for extra sparkles!
Cupcake goodie bags. Simple clothes pin clip keeps the goodies inside!
Cupcake deco-sticks. We switched out the embossed butterflies(above), and went with the cupcakes(below). I think I totally agree with the cupcake choice ;). Stamp and punch are from SU! Flower bg is from my PTI flower die set.
Wednesday, June 22, 2011
Tuesday, June 21, 2011
SU! Swap...
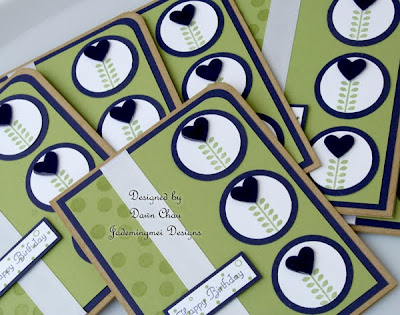
I recently joined a SU! hostess group and I'm soo thrilled to be getting my feet wet with this new card swap! When I first started out stamping 4 years ago, I started out with SU! sets. Over the years I have almost completely converted over to clear stamps, but fell in love with this Valentine's set and knew it was a must have! I have since purchased a few more new SU! sets that I adore AND you can now use them with acrylic blocks...happy girl! I started with SU! cs in concord crush and pear pizzaz. These two colors are really bold and bright against my PTI kraft cs. I did step out of the bounds and used my trusty PTI polka dots in versamark for the left side! Once I punched my green floral vines, I went back and punched out hearts in the concord crush. The hearts are raised with foam tape and accented with crystal effects to make them shiny! Super simple, but sweet card ;)
Friday, June 17, 2011
Sweet Tooth...
ETA: Sandy would like to know where I get my clear bags for these treat sticks so if anyone else is interested here is the link to clearbags.com ;))
1x8 CLEAR BAGS
TGIF! Sharing something a little sweet today! These are some goodies I made recently for a customer who wanted a little something for her children to share with their classmates at an end-of-the-year party. This batch I made with m&m's and a 4th of July theme. I used some mini manila tags and recycled some heart buttons. The buttons had a loop on the back that was cut off, allowing them to lay flat on the paper. The patterned paper is from a new Pink Paislee pack that you will see below.This is the new Pink Paislee pack I picked up on my last visit to VA. It's a super cute 6x6 pad and here I showed the 3 sheets I chose for this project. The great thing about 6x6 pads is that the pattern is the same as the larger sheets, but on a smaller scale...this allows you to use your favorite sheet on smaller projects!I made this bunch with skittles to avoid a peanut allergy with the m&m's. Still a great and sweet substitute! This was the first time I'd used skittles and they fit just as nice and snug as the m&m's.Added a little crystal effects for a shiny melon! I thought I'd add this quick note on how I made the watermelons. Just layer your circles then cut in half. When it comes to getting your 'seeds' lined up(below), stamp both corners and the middle FIRST...then go back and add your additional seeds. This will give you nicely spaced out seeds without having to guess if you do them one at a time ;).
Tuesday, June 14, 2011
Vintage Tag Spree...
Getting in the SPIRIT of the holiday! Fourth of July is not only my favorite holiday, but it feels me with a lot of creative inspiration as well. There is nothing better about stamping then being able to mix and match! These tags were created with a mix of Hero Arts(silhouettes) and PTI(est. 1776) stamp sets. I brought out the Tim Holtz vintage inks(tea dye and antique linen) to create an Americana feel. The ribbon is hand dyed with my Putty copic re-inker. Looks a little greenish in the photo, but is more of a slate/concrete tone. The ribbon on these tags was made before I even had a theme. Luckily, the ribbon and stamp images coordinated perfectly! Merci is from a new BIG set from PTI.
Taking a slightly angled shot here allowed you to see the shimmer(above) ink vs. looking straight(below) on. There are so many fun ideas on how to use these tags! I needed a quick gift this weekend, so I grabbed a bottle of wine and attached a nice handmade tag to the bottle. I have loaded a few sets into my Etsy shop for purchase(link is on the upper right of my blog). If you'd like a custom order or a larger quantity, you can simply email me at madscrapper24@yahoo.com
Everyday is a great day to be inspired by something ;)
Monday, June 13, 2011
Girly Graduate...
Happy Monday! We are officially on Summer vacation and you would totally know it with yet another sunburn! I was pretty good about getting several layers on, but fair skin+sun+beach=glutton for punishment! Luckily this weeks is not as bad as the previous...next time I will just stay fully clothed WITH gloves...lol!
Anyhoo, I've got a quick card post to share with you today! I picked up For The Graduate stamp set for this card and made a girly spin on the colors and layout. If you have been following me via facebook, you know I have been linking fun tutorials about seam binding etc. Well, I bought myself a roll and these little rosettes were my first trial run with dyeing and twisting. I followed a simple and easy tutorial by Debbie and used a light pink copic refill. I'm not sure if there are other re-inkers you can use. I did try another strip with SU! re-inkers and it didn't dry as quickly and the crinkle is a little softer. With the copic re-inker, it dried fast because they are alcohol based and I was able to use this seam binding within 5 minutes of dyeing. I used a large scallop die on the inside of my card to create a pocket for the money. A nice and simple gift for any grad on their way to college!
Saturday, June 11, 2011
Road Trippin' Snack Basket...
A very special gift, for a really awesome family! There isn't much that is predictable in life, almost NEVER in the military lifestyle. It is PCS season once again(moving time!) and although we have not had to do this since we left NYC, we said goodbye this morning to great friends who became our family away from family. I suppose after we finally bought our own home, we became comfortable with our surroundings and were in denial that our neighbors would always be the same great folks we met nearly 3 years ago. I'm thankful for the M family...lots of laughs, kindness, and most importantly...a lifelong friendship!Since their trip will take them a week or so to reach their destination, I wanted to put together a snack basket FILLED with lots of goodies. I took into consideration that it could not be made too large, but needed to hold as much as I could get stuffed in there! I knew I couldn't go wrong with this lime green basket that I picked up at Mike's. A neat idea I came up with for gift card holders. I wanted each card to represent the children's personalities! These are very simple to make up. I think I may do a tutorial on the next round I make! Wouldn't this pattern be cute for Christmas gc's to hang on the tree??!On the reverse side, I just flipped up the bottom half and taped down the sides, and slid in the gift cards. There was plenty of room to write a quick message of thanks on the back. I figured with all the stops they had to make along the way, gift cards were a nice and compact gift when the car is FULL of luggage and kids!
Thursday, June 9, 2011
Monogrammed Teacher Gifts...
School's out for Summmmmmmmmmer!! Our last day is tomorrow here in NC and myself and the kids can hardly wait! We have several family trips planned this Summer and a wedding so it will be packed. I wanted a fun way to say thank you to the teachers...besides the candy and bath stuff that teachers are probably overloaded with...am I right??? And even though I said I'm no fan of decorating with apples, I hope I have redeemed myself here by throwing in a Staples gc...something they can REALLY use! There are many ideas with clear cups and these drink mix combos...I first saw these on my crafty friend, LYNN's, blog! You can also check out Jen's HERE, and Susan's HERE...love their use of the ice cubes...ADORABLE!I trekked to Wal-Mart and Target in search of plastic cups. Then I remembered my sweet friend Stephanie(Sweet Southern Designs) does monogrammed cups. I have bought a few of these as gifts in the past, and I'm amazed for being clear, they really do keep your drink COLD for several hours! SCORE! I simply filled them with Lipton Tea and several types of Crystal Light. To keep the packets from moving around, I added some shredded kraft paper in the middle.Simple Apple gift card holder. I like this new shape and it fits the card very snug so it doesn't slip out. Apple set is from PTI.
And of course, she really should have something 'stronger' in her glass...Ms. Denise, the bus driver ;) It's been a great school year! I always get a little anxious about the year ending because it means my babies are getting older. Both of my girls will be in school full time this Fall and I'm just not sure I'm ready for that ; (.
Monday, June 6, 2011
Banner Frenzy...
Somone got a little crazy this weekend and not only cleaned her crafting space, but once it was clean, she felt inspired to get crackin'! I've been on a patriotic kick lately and decided I'd get my creative juices flowing on banners. I pretty much stayed in my space all weekend. For those of you who know how I work, or have purchased my creations, you know my dedication. Each of these 3 banners took about 4 hours each to make. Time consuming, yes, but a few of those hours were set aside for glue drying.
FREEDOM--is a special thank-you for my sweet friend who made me realize the older I get, the less I need or want. She has taught me the true value of quality friendships! Thank you Donnak for making my birthday so AWESOME! Each card panel is 4 1/4 by 5 1/2(blue cs), the top layers(red and kraft) are cut down 1/4 so they nest nicely on top of each other. The red striped paper as well as the smaller kraft polka dots(underneath the lettering) paper is from DCWV Nautical Paper Stack. To create the accordian circle I took 2 strips of blue cs(1 cut at 1.5 x 11, the other cut at 1.5 x 8.5), scored each one, then taped both pieces together. Once you have the ends taped together, you then attach a small circle to the accordian circle to keep it all together. These circles are very, very strong...much like corrugated cardboard. At this point, I left the accordian circles to dry for at least 2 hours...which gave me plenty of time to hop over to my Cricut and cut out the lettering. Lettering is from the Storybook Cartridge on the 'fancy' option and cut onto SU! red glitter paper....absolutely LOVE this stuff!CELEBRATE--this one is for an upcoming 4th of July party in GA. We will be heading down to visit my sister soon and my niece and daughter have July birthdays so I told my sis I'd take care of the decorations/supplies. I figured after the party is over, she might like to keep this little gem and put it on her fireplace hearth ;)AMERICA--is an extra banner I made just for fun! If you'd like to purchase her for yourself or as a gift, she is available in my Etsy shop today! I will have a few more gift ideas this week. Some cute teacher gifts and another friendship gift. I hope this inspires you to create something fun!
Subscribe to:
Posts (Atom)