STAMPING SUPPLIES FOR SALE

Showing posts with label Sewing Projects. Show all posts

Monday, August 30, 2010

Cammie Purse Tutorial...picture heavy!

We recently had some dear friends retire from the Marine Corps after 29 years of service. I needed something special for my dear friend Donna, it couldn't just be "anything"...we share a love of papercrafting, but nothing paper-y was going to suit this special occasion. After some careful thought, I decided a cammie purse would be a fabulous idea! I'm no expert when it comes to sewing and I'd recently seen a presentation of the Accuquilt at Joann's. I love this machine, but with all the die cutting machines I own (see previous post!), I decided I could accomplish the same cuts, but for far less of the price of the Accuquilt...do love it, but with the price of the dies, I would have to work 3 jobs to support that habit! This post is very picture heavy, so I will be doing simple instructions!Joe and Donna Baes. Donna was the first person I met and became dear friends with when we were stationed here nearly 10 years ago (this is our 2nd tour in Jacksonville, NC). Our friendship made the move back here an easy transition :).There are a few prep instructions before cutting your cammie fabric:
1. Pre-wash (I did not do this as I used a recycled pair that had been washed many times!)
2. Heavy starch, then iron to make your fabric stiff...no frays is what you want.
3. Choose your die size...Nestibilities-large classic scalloped rectangle...you will need 48 rectangles total, 24 for each side of the purse. You may have to crank your die through a few times depending on thickness. The scallops make it tremendously easy to line up your edges. I sewed scallop edge approx. 1/2 inch on the seams. This the back side......front side.After both sides were sewn, I went back and decided to add a quilted look in pink thread :).Next comes your pocket! Since I recycled this pocket, I needed to use a seam ripper to get the backing off the pocket.Use a seam ripper to rip off the backing.Center your pocket and sew.Now it's time to add your fun fabric on the inside. This is a Waverly pattern I chose here. You will need to your cammie fabric facing UP and your inside fabric facing DOWN for this sewing step.
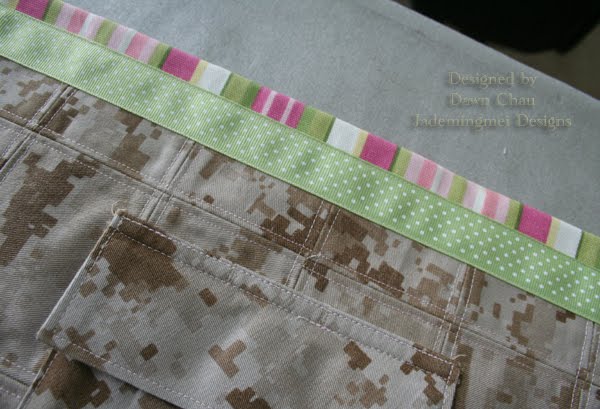
Once your inside fabric is sewn on, fold it down 1 inch, starch and iron.To cover my fold-down, I added some polka dotted ribbon to hide my stitching. Keep the ribbon pinned until you do the top stitch, when sewing the bottom end of the ribbon, remove the pins BEFORE you stitch or it will cause ruffling...that is not the look we want here...lol!Ribbon is nice and flat!
Time to sew both sides together...sides are face to face...then sewn.When sewing both sides together, match up your seams with straight pins. This will ensure your seams will all match up when you turn it right side out.See!
Trim the corners before you turn it right side out...this creates less buldging in the corners.
Turn right side out. Check for any imperfections. If you have any trouble getting your corners to poke out nicely, you can use the back end of an ink pen and gently push them out.
Fold your purse back inside out and add the bias tape. I don't have the patience to make my own tape, so I purchased mine in the thread isle of Hancock Fabrics.

The bias tape gives a nice finished looked on the inside and also hides the raw edges.
Almost done! Add your nametapes and......voila! Your purse is now complete! You can leave it just as it is, or add a fun vintage flower as I did here!I did not take any shots of how I put together my flower...but you can find all the steps HERE and HERE if you'd like to give it a try! Check out Jen del Muro's flower as well...I love the scalloped edges!I cut some felt and added a pin so the flower is removable for washing. Over time, this flower will fray and look even more vintage! I'd love to see other fellow sewers recycle those cammies and see what you come up with. If you do, please link it back here and I will share it ;).

Thursday, August 26, 2010

Die Cutting Machine Info...

I'm working on a tutorial on how I made this bag for a dear friend. Would you believe all the fabric rectangles were cut with my Spellbinder Dies and Cuttlebug?!! Before I get to my next post on how to make this bag, I first had a request on which die cutting machines work best for fabric. I own several die cutting machines: some fantastic, some not so much, and one that advertises you can cut fabric like butter, but it really doesn't work (at least not for me!).

So for Ashley and anyone who would like some help, this is for you!

The die cutting machines I own are the Cuttlebug, Cricut Expressions, and the Wizard.

1. Cuttlebug- is probably my favorite and most inexpensive machine that is very versatile with fabric AND paper! I love this machine because it's compact and has a heavy duty suction pad on the bottom to sticks to your table. It's pretty self explanatory for cutting paper, but when it comes to cutting fabric there are a few things I've learned that help make the process easier.

Iron and starch all fabric before cutting. This allows for a stiffer fabric and also cuts your fabric like butter with NO FRAY ends! For heavier weight fabrics, you may have to run the plates thru a few times. For the cammie purse above, I ran each rectangle thru twice. I also like the handle on this machine much better than the toggle crank on the Wizard...much less stress on your hands!

2. Cricut Expressions-a wonderful die cutting machine for paper and not so much fabric. My first try with cutting fabric on the Cricut was disastrous. The blade would cut the general shape, but it did not cut the shape out in its entirety. I had to go back and cut around the shape with mustache scissors...already an added step I could have avoided! Also, when cutting fabric on your Cricut you have to iron on Underwonder to stiffen your fabric so it won't slip (it slips!) on the sticky cutting mat. Next!

3. The Wizard-much like the cuttlebug, but with a different handle ("wrench" like) and plates. This machine will cut paper AND fabric. When cranking the plates through this machine, it can become tedious with the crank handle and you insert the cutting plates from the back. I have used this machine for the last few years and it's been wonderful. The Wizard is used in conjunction with Spellbinder dies (which can ALSO be used on the Cuttlebug!) which are made of steel and compact. I love that you can use these dies on other machines, because if I don't feel like using the Wizard, I switch over to the Cuttlebug because I prefer that handle when cranking. The only downside, which does not effect cutting ability, is that the cutting plates flake after long uses...think of when your skin peels after a sunburn! It drives me crazy having flakes everywhere. I did have them replaced (free of charge) from the manufacturer, but my 2nd set of plates eventually did the same thing. Again, it never interfered with the ability to cut precisely, just annoyed me! Hobby Lobby carries the Spellbinder Dies...too bad I don't have one here;(

Bottom line...if you want to cut fabric in one easy step, use a pressurized die cutting machine (Cuttlebug, Wizard, etc.) not a blade (Cricut) machine. I'm not endorsed by any of these companies. I have learned my trial and error what works best for me! Before investing in any die cutting machine, you need to way the odds of how often your going to use it.

Before closing, here are a few more machines I thought I'd share with you...I have not tried them, but they are on my wish list!

1. Spellbinder's Grand Calibur---you could cut some nice sized appliques with this machine...watch the video closely, I'm wondering how well that suction cup on the bottom really works...if anyone owns this, please let me know! Thank you to Kimberly Crawford for posting this!

2. Accuquilt---two machines for the "mac daddy" of quilting---GO! Fabric Cutter and the Studio Fabric Cutter. These machines are pricey, but if your a hardcore quilter, why not splurge? Just think, no more dragging out the ruler and rotary cutter! LOVE THESE!

I hope this has been helpful! Again, I'm no expert in the paper or fabric world, I just learn as I go!

Thursday, June 3, 2010

Dressin' up THE Dress...(tutorial)

With the start of Spring/Summer and hot weather arriving, we made a trip to Marshall's to pick out some new shorts and dresses for the girls. My oldest picked out this plain jane dress, which to me SCREAMED "blank canvas". You will have to scroll to the bottom to see how my Daughter "loved" Mommy's idea!
The neckline looked rather plain to me so I thought I'd add a little dazzle with some ribbon and a vintage flower.
I started by folding over the ribbon to make pleats. The ribbon is folded at about every 1 inch and pinned directly to the neckline.
She's all pinned and ready for sewing!
Sewing is complete! be sure to go slow with you machine as you will have the added thickness of the ribbon.
Making the vintage flower! I used approx. 18 inches of 2 inch polka dotted grosgrain ribbon for my flower.
Loosely gather your ribbon and sew in the middle to allow for proper gathering. This is a good spot to heat seal your ribbon edges to prevent fraying.
Flower is complete! Don't worry about your visible threads, you will cover them later!
To make the inner layer of your flower, you will need the largest cuttlebug die in this flower set. I folded over my material tight enough to make a "heart" shape at the top. I sewed 2 stitches to keep the flower tip from opening.
Adhered my black flower tips on with E6000.
Covered my threads with a vintage LARGE rhinestone.
At this point, you can glue your pin on the back. I would've rather used a black piece of felt on the back, but I didn't have any. I'm not too worried about how the back looks like because you won't be able to see it, nor will it be going in the washer.
How snazzy is this?!!!!
Since I used a pin on the back of the flower, you can adjust her where you want:) You see that Amy Bulter fabric in the background?? Well, that my friends is my peg board that I decopauged because I didn't like the holes showing through! It's super easy to insert my hooks etc. You can see on the bottom where I store all my punches in my IKEA baskets/rods.
In the end, this WAS a surprise for my oldest Daughter and I hung it in the foyer so she could see it when she came home. Well, she hates it and told me so...said we should throw it in the trash! I never expected that from her and she asked me if I could take the ribbon and flower off?!!! Needless to say, it sent her in a total tear fest and she was terribly upset that I ruined her "normal" dress! I did hang it on her doorknob yesterday in the hopes that she would wear it today. She woke up this morning and dressed her little sister...any guesses to what little sister was wearing???!!! Little stinker!

Thursday, February 5, 2009

Bag of Any Kind??

I happened to be making these for my girls for Valentine's Day and then I saw THIS POST on Nichole Heady's Papertrey Ink Blog...so why not, right?? I used the PTI Trajan: Monogram Edition(A is for Addison:) & Guide Lines for this project. The top fabric is a simple muslin backing and I used Black Stazon ink. After I stamped the images, I then heat set the ink with my iron.
I just wanted to put this up really quick for the contest. I've been away from my blog this past week due to a family illness and I will not resume for the next few weeks. It has been very hard on my Parent's, sister's and myself. Life is short, take a minute to squeeze those you love:)

Friday, February 8, 2008

Burp Cloths are BACK....

Here's a brand new batch of burp cloths for sale. I've had several requests since the last time I posted these. I have all new patterns! These cloths are 100% washable and you can also throw them in with regular laundry. If you are interested contact me directly @ madscrapper24@yahoo.com I do have more fabric available if I sell out of a certain pattern, just check with me before sending payment:) I will accept paypal or postal money order only. Each set comes complete with two cloths that are sewn by yours truly:) They are backed with the best quality gerber cloth diaper and super thick to prevent any leakage.

What you see posted is what I have on hand and ready for immediate shipping.

Cost: 20.95 and does include priority shipping.

Thursday, April 5, 2007

Sweet baby GIRL...

It must be baby season around here...lol I made up this quick gift for a friend. Since Spring is around the corner...hopefully soon in NY...I chose to use some fun and bright colors. The set of burp cloths are made with Flip Flop material from Fabric Attic(their quality is awesome!)and the backing is a Gerber Cloth Diaper. I finished it off by tying with M's ribbon. The candy jar is covered in Anna Griffin and I used the SAB punch set for the tag. Now off to get this in the mail, as the baby is due next week! YEAH!!

Thursday, March 1, 2007

Cuddly baby blanket...


I did this cuddly blanket for a friends new baby. I thought the material was fitting since they are a Navy family and they have a new son. I had done a previous prototype(on a much smaller scale!), but wanted to go for the BIG one! I'm really pleased with how it turned out. My sewing machine probably needs a tune up with all the projects I've done the last few years. She was a little squeeky tonight, but got the job done:) I'm not big on sewing anything rounded, but I can sew a mean straight stitch...lol So what do you think?