STAMPING SUPPLIES FOR SALE

Showing posts with label Cards. Show all posts

Friday, November 4, 2011

Christmas Wreath Card...

It's a chilly evening here tonight! And with the chill, its got me in the spirit to pull out the Christmas stuff...or at least on cards for now! These cards are from a recent Christmas Card Swap I shared in with a local scrap store. Don't you love those red berry wreaths you see everywhere during the holiday season? I know I do! Although I kept my design fairly simple, I really did want to add this little birdy to the wreath...he's kind of cute dontcha think?I used my copic makers in 2 shades of green for Mr. Birdy and then glossed him over with crystal effects.In the meantime, posting here on the blog has been slow...much slower than I'd like it to be. I do have a few older projects to share and in between a bumpy pregnancy and attempting to get my studio moved downstairs, I'm not getting anywhere quick! After a fainting spell at the grocery store last week(I KNOW how to make a scene now, don't I????!!!) I've been taking it easy and dabbling in crafting when I'm up for it. I really need to get my mojo back as there are so many cute things I'd like to make. For now, I will continue to share what I've got made up and hopefully some new stuff in between!

Happy Crafting!
Dawn ;)

Thursday, October 6, 2011

SU! Swap Stockings Galore...

Before I get started on today's post, I'd just like to say a little 'thank you' for your comments on the sketchbook post. The sketchbook really is a great tool when your sitting there 'stumped', got all your supplies out, and no where to go! I did in fact make myself one as well, but she is a little bland...just the plain ol' clear binder. When I have some free time, I think I will dress her up a bit!

Now, on to today's post! It might be a little premature to be posting Christmas stuff here(because I still have some cute Halloween ideas yet to share!), but I really was super excited to try out the new SU! stocking die! The size of the stocking is larger than I thought and I really like that. There are several dies I have by SU! and I will be honest, they are much smaller in person than when I see them on blogs etc. The wonderful thing about this larger stocking die is that you can make banners with it too! This stocking collection is for a SU! Swap coming up this weekend. I immediately thought of a gift card option and knew I had to try it! To create the stockings, you will need to cut out 2 stockings...1 in patterned paper for the front, 1 for the kraft paper in the back. Those 2 pieces together will create your pocket to hold the gift card. The Window Punch from SU! makes the perfect slot to slide your gc inside(I used my library card to ensure the pocket was just the right size!) Love, love, love these textured paper leaves! These leaves come in a large pack loaded with leaves of different sizes at Mike's. The red Dew Drops(Poinsettia Jar) were glued on with SU! Crystal Effects. Patterned paper is from the paper pack O' Christmas Tree. After I assembled the stockings, I wanted to add just a bit more glitter with my Stickles Vintage Copper. The glitter lines really POP with the bright Christmas colors.

Tuesday, September 20, 2011

SU! Fall Swap...

Short and sweet post today as I'm finishing up a few custom orders this morning. I recently had another SU! swap and this time the rules called for Fall colors. There aren't many SU! sets still left in my stash(once I switched over to clear), but I've kept a few old ones and now I'm finding some new ones that I really like(Wicked Cool) too! I've held on to this baroque set and decided it would work perfect with my Fall colors. The layout is a simple one-layer design and then I just added some polka dotted ribbon from May Arts.
Happy crafting!
Dawn ;)

Saturday, September 17, 2011

Batty Eyes...

Another trio of Halloween cards. I used a mix of PTI and SU! sets here to create my 'spooky' look. To create my bat squares I used the PTI-Take Three die and it cuts out 3 rounded squares at one time. Then for the yellow matte underneath, I used my CM square punch. The moon is created with my spotted dot set and the bats are from Wicked Cool again. I added some googlie eyes to 'spooky' and adhered it to a strip of black grosgrain ribbon. Super simple, but fun layout. I'm getting ready to load these up into my Etsy shop...if interested, they will be available in sets of three, one design from each of the three that were featured this week. I'm also working on getting some more candy packaging, tags, etc. in the shop, so stay tuned!

Happy Crafting!
Dawn ;)

Thursday, September 15, 2011

Pumpkin Legs...

How's that for a post title?! I love it! I pulled out my stash of Halloween papers and there was a full 12x12 sheet of cut outs and this is what came to mind...'why not put a pumpkin on legs' I thought! The only stamping I did on this card was the sentiment(Wicked Cool--SU!). I decided to add the orange rhinestones for eyes...makes me feel like this kooky pumpkin is watching me on my crafting table...LOL! Happy Crafting!
Dawn ;)

Tuesday, September 13, 2011

Spooky Surprise...

I realize it has been well over a month since my last post! With all good intentions, sometimes LIFE gets in the way. I've had a very good excuse as to not posting and that is having the wonderful joys of morning sickness! I've been terribly sick with baby #3 and if my instincts are correct, this HAS TO BE THE BOY! I don't remember feeling this ill with either of my girls. My other 2 pregnancies, although a little queasy, were nothing like this one. I'm hoping it passes soon as I've got a few projects I'd like to get going! Needless to say, the whole family is quite thrilled and my 5 year old has given me all sorts of name options, although they are all girl names! Maybe she knows something we don't? We are expecting Baby Chau's debut in April 2012.

Anyhoo, I did force myself to sit down and create some fun Halloween cards. This week on the blog I will be sharing several trio's of cards. Today's creations are done with the Wicked Cool set by SU! I must admit that I've had Really Rust CS in my paper collection and have never, I mean NEVER used it! I cracked open my SU! catty and realized they had used it along with Rich Razzleberry and Pear Pizzaz...I think I can learn to like it now! The Lattice Die(SU!) design is also a new one for me. I cut out the lattice design in Pear Pizzaz and added the Rich Razzleberry CS underneath. Every witch needs a shiny vinyl hat! The hat is popped up with foam tape and a thin layer of crystal effects was poured over the top.

Thursday, August 4, 2011

Owl Cards...

Last 'hootie' post of the week! Today I'm sharing some clean and simple cards that all you really have to do is add the owl embellishments. I decided to use the small heart punch on these owls(heart comes within the owl punch), but I'm still not convinced that the red glitter mixes well with the pastels?? Either way, I'm on an owl kick right now...don't be surprised if they spill over to next weeks posts as well! This set may not look familiar for PTI fans, but believe it or not, it's what I received in lieu of 'Say it with Style'...7 one of a kind sentiments...that look nothing like 'Say it with Style'...lol The sentiments were still perfectly usable, and 'hoo' wouldn't love to add a few rhinestones to the lettering?!! I do finally have the replacements, so hopefully I will get to play with those soon! We are off the beach today! We've got 5 nephews visiting for the week so my house is full of energy that needs to be exerted! Have a splendid weekend and happy crafting!

Wednesday, July 20, 2011

Dashing Through The Snow...

Yeah, it's not quite feeling like 'snow' around here today. Temps are over 100 with the heat index, but since this is our first day in HOT weather, I won't complain too much. We are not suffering here as is most of U.S. right now. NC has been hovering in the high 80's the last few weeks and it's been blissful...I knew it wouldn't last forever.

In the meantime, I've got a set of fun cards to 'cool' you down a bit. This is the first time I've used my reindeer stamp(SU!). I bought him at the end of last season so he's been sitting around, collecting dust etc. Anyhoo, I mixed my reindeer with some Papertrey Ink(ribbon tails, polka dot basics, and woodgrain) sets and SU! new cherry cobbler ink...which is super close, if not the twin, to cranberry crisp. The reindeer is gold embossed and accented with twin stars that I stuck together with a rustic copper brad. I'm off to finish the mess of owls I've created in my craft room. I got carried away last night, but have a lot to show for it ;).

Monday, July 18, 2011

Washi With A Little Ginge-y...

Today I've got a set of cards using the Washi Tape again. If you missed the tutorial on using Washi Tape, just scroll down to my previous post for some easy-to-follow tips. I used the same stamp sets, Signature Christmas and Holiday Button Bits. I loved this patterned tape and thought it felt just like a gingerbread house so I decided to cover my entire vanilla card stock. I outlined ginge-y in Copper Stickles and filled the frosting lines with Liquid Pearls(puffy paint, but better!). She looks DELISH!This card follows the exact tape layout I did in my tutorial. I left the gaps open so I could add the candy cane twine. Make sure if your using twine that you pull it taunt when taping on the backside...otherwise is stays loose and your twine will sag.Stay tuned this week for more Christmas goodies! Happy crafting!

Friday, July 15, 2011

Washi Tape Tutorial...

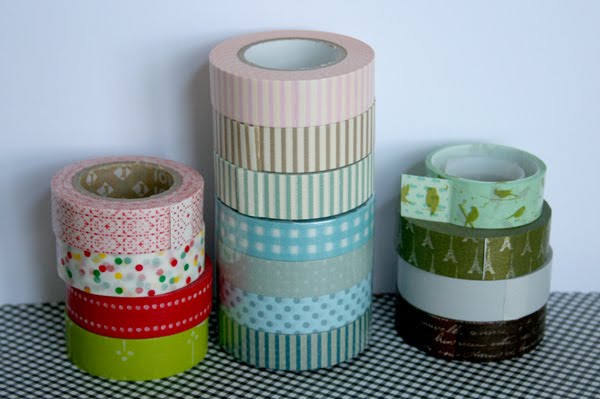
So if you've been on the FB page you know I've been drooling over this fun new product(Washi Tape) I've been experimenting with. Now, I will tell you, it really is not a new trend or fad, as a matter of fact I remember seeing this as a kid when I lived in Hawaii(some 20 years ago). In Hawaii this tape is known by Kawaii Tape. It's essentially the same thing, thin rice paper tape, but the Kawaii versions have cartoon characters like Hello Kitty etc. There are lots of places to buy Washi Tape and the collection I'm sharing with you today is from Etsy. Today's post is going to focus on the Christmas stack on the left. Let's get started! I decided to make my own background pattern so I used my CM self healing mat to keep my line positions straight. The tape is not super sticky, so if you need to reposition, just don't press down hard your first try...don't ask me how I know that!Next, you can trim off the excess if you'd like, but I chose to simply tuck behind onto the backside of the card stock.I mixed two patterns for two separate cards.Voila! See how pretty your background comes out? I didn't want to cover up too much of the pretty tape(Washi Tape is fun to play with, but it doesn't come cheap!), so a few textured 'holly' leaves and some red Dew Drops finished my focal image.I was needing a little more depth and texture to my leaves so I traced around the edges with my Copper Stickles.On these cards I only used 1 green strip of Washi Tape(underneath the red ribbon) as an accent.The stamp set is Holiday Button Bits. My cards are on a smaller scale than A2, so I chose to substitute buttons with Dew Drops...sparkly! Next post will share some more Washi Tape designs with some yummy gingerbread! Although I've used this tape for holiday cards, I'm almost certain the tape would also make fun monogrammed cards?! ;) I just might have to play with some of those too!

Thursday, July 14, 2011

Pretty Bird, Pretty Bird...

I've been busy doing lots of fun stamping projects and I hadn't realized as I was posting this card today, but there is absolutely NO stamping here! I had to double check to make sure! The bird and thank-you font are all one piece on the pink striped chipboard. I found a small 4x6 sheet of Lost & Found chipboard embellishments during my last venture to Scrapdoodles in Fredricksburg, VA! If you've never been there and live close, you NEED to swing by! This store blows all the big box stores away when it comes to paper crafting. I live 5 hours from there, but it's on my way to my in-laws...makes the last hour of travel totally worth it ;) . The glitter comes with it too! I really like this glitter because it's almost identical to the german glass glitter...has a nice vintage glimmer in the light. I added a few extra embellishments and the scalloped border to finish my design.This is the sweet little packet I pulled my patterned paper from. The lilybeedesign pack is available from Archiver's.

Wednesday, July 13, 2011

Flutter Butterflies...

Thank you ladies for your kind comments on my last post! It always amazes me where inspiration can be found and as many times as I tell myself 'I'm totally going to try that', the thought slips and I'm stuck in a funk again...I know you all can relate! I will keep browsing the magazine isle and see what strikes my fancy! If you've got a cool link or something neat for a card challange, post it here on the blog(comment section) and we can all play along!

Today I've got some more mini card sets to share here on the blog. This first set is all Papertrey Ink sets with SU! colors, pear pizzaz and concord crush. I love the deep shades of purple and blue that jump out in the concord crush...the pear pizzaz cools the deep colors down a bit. The main image is the new Mehndi set and I used the smaller Mehndi designs for accents on the left. The sweet little butterfly was purchased from a friend who does hairbows and I've been holding onto them for 'just the right' project! A fun mix of PTI and SU! here. The woodgrain(in pear pizzaz) is from PTI as well as sentiment. The flowers are from SU!...I think this set may be from the spring catty? I flipped the design sideways on these two beauties.

Tuesday, July 12, 2011

If You Give A Girl A Cookie...

...she will be inspired! While I was in Savannah a few weeks ago, there happened to be a cupcake store around the corner from our hotel by the name of 'Gigi's Cupcakes'. My sister(who we call "gigi") and I were determined to make a visit there with the kids. We did make it, but it had just closed and that started my mission to find some cupcakes for the night. It turned out to be a mission and we settled for some cupcakes from Fresh Market. They were just ok, but while at the checkout, this Martha Stewart mag caught my eye! I didn't really care what the inside contents were, the 'eye candy' on front was enough for me! Tah dah! Mini note cards. I stamped the large dot stamp first, then added the 2 smaller circles on the side. The center circle is punched out and matted on red cs with a little rhinestone. And then I tried my new Mehndi stamp from PTI. Isn't she lovely? I made some more mini cards with this set that I will show you later in the week.